My Shooting Pro is a powerful, accurate and simple shooter application for Android devices. In a few clicks, measure the result of a group of your hits on the target. The main purpose of the application is to measure the group of hits, correct the shooting, improve your shooting skills, save and share the results. With the app, you can easily track the progress of results and calibrate optical and other sights. The application is also suitable for shooting competitions, e.g. for the referee's measurements of the competitors' results.
Screenshot of the open navigation menu, swipe the screen from left to right or click the Menu icon in the upper left corner or click the toolbar at the top of the screen.
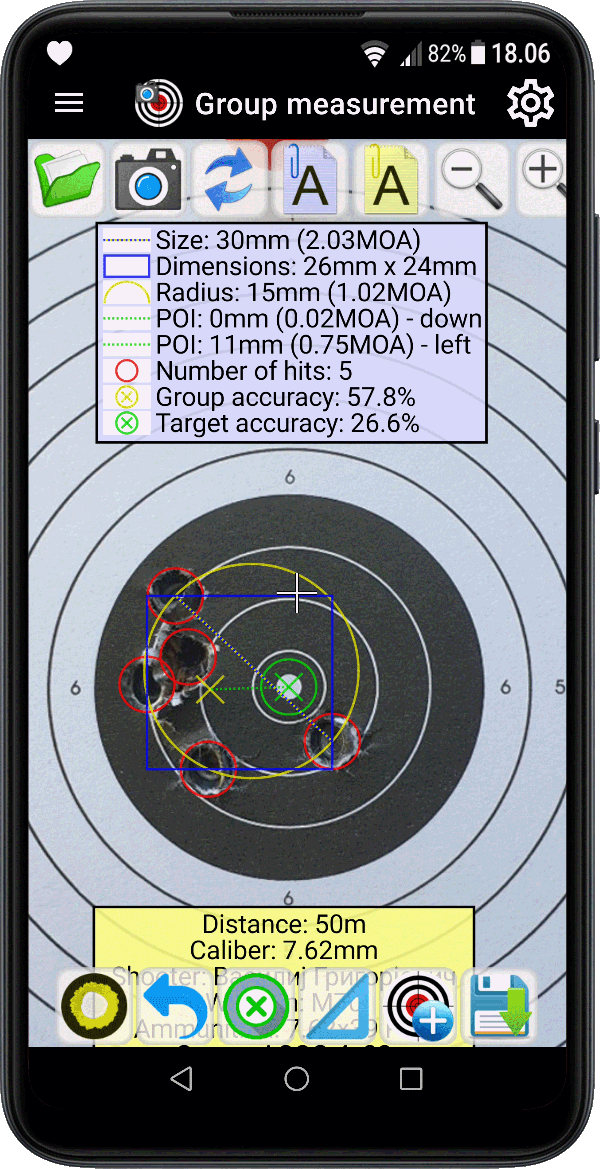
Screenshot of target processing. The POI relative to the POA is now displayed as MRAD or MOA deviation in width and height.
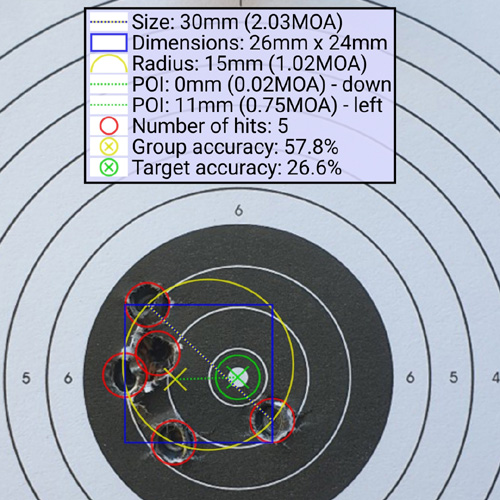
An example of a processed target with the displayed result.
You can also share it with friends or social networks via your device.
Here it is clear that the sight should be moved to the right by 0.75 MOA, so that the POI is in the very center of the target.
Go to Legend to read more.
- Take a picture of the hit target
- Enter the dimension of the target or part of the target
- Mark your hits and the center of the target (POA)
- Measure the two furthest hits
- Measure the square dimensions of the group of hits
- Measure the radius of the group of hits
- Find the deviation of the POI(Point of Impact) from the POA(Point of Aiming) in height
- Find the deviation of the POI(Point of Impact) from the POA(Point of Aiming) in width
- Measure group accuracy, ie. the accuracy of the distribution of your hits in the group (only in Pro version)
- Measure target accuracy, ie. accuracy of the group in relation to the center of the target (only in Pro version)
If you enter the distance and caliber with which you fired, the angular measurement will also be included, which is very important for shooters with optical sights. Now, with the above parameters you can easily calibrate your optical sight.
The application has imperial (inches and yards) and metric (millimeters and meters), as well as angular measurements in Milliradians (MRAD) and minutes of angle (MOA). Note: The application takes up a minimum of resources on the device.
Before use, it is best to make the application settings first, by clicking on the menu (up-right icon)  .
.
1. PICTURE: Take a picture of a target with shots
 . You can do this from the main(home) screen
 ,
or from the Group Measurement page
,
or from the Group Measurement page
 .
.
You can capture your targets from the app's main(home) menu and process them later. They will be in the Camera Pictures option
 .
.
You can also take(grab) pictures from your public image gallery that you took earlier
 with your default device camera app.
If your target does not have a specified dimension, you should know some dimension from the target, that you will later use as a reference in the program. For example, the width or height of the target, or the diameter of a circle from the target. On some targets it has already been printed.
Note: Try to photograph the target at a right angle.
2. GROUP MEASUREMENT: In the group measurement menu, you first need to measure and enter the reference value-dimension (discussed above) using the blue ruler button
 .
.
Then mark your hits on the target with the yellow button
 and the center of the target with the X button
 .
.
To cancel the last marked hit - blue back button
 .
.
To cancel the target center, click the X button again.
Marking the center of the target is not necessary, although its position is the basis for calculating the POI.
- (A) If you have finished marking the group, now center and attach / detach the "Blue Paper"
 with the data of that group to your image. Too, use the magnifying glass button
 to increase and
 to decrease its size.
You can also hang "Yellow Paper" , which contains information about shooting, shooter, conditions, etc.
If you have not previously entered the shooting parameters (range, caliber, weapons, ammunition, etc.), you can do so now in the settings. The program will recalculate upon returning to this page.
, which contains information about shooting, shooter, conditions, etc.
If you have not previously entered the shooting parameters (range, caliber, weapons, ammunition, etc.), you can do so now in the settings. The program will recalculate upon returning to this page.
- (B) If you have more than one group of hits on your target, which you shot under the same conditions, center and hang only "Blue Paper" and start marking the next group of hits, by clicking on the button with the target and the + sign
 .
Since you have already entered the reference, continue marking the hits and the center of the second group. After the end, hang the "Blue Paper" for that group again. Repeat this procedure for each subsequent group of hits.
When you have finished all the groups, hang the "Yellow Paper".
.
Since you have already entered the reference, continue marking the hits and the center of the second group. After the end, hang the "Blue Paper" for that group again. Repeat this procedure for each subsequent group of hits.
When you have finished all the groups, hang the "Yellow Paper".
Note: Before saving your results you can change the shooting parameters by clicking on "Shooting adjustment"  in the menu .
After exiting the settings (returning to the analysis), the changes will be applied immediately.
3. SAVE THE DOCUMENT: Click the save button  , enter the document name, and, if desired, select the option to save a copy in your public image gallery.
You can enter text for the document name that will associate you with the shooting.
There are various ways shooters measure their hits. Several of the most common ones are covered in our application. Let's look at the explanation of the results from the legend (table):
1.  Size: The distance of the two furthest shots from the group.
It means the dimension from the center to the center of the hits. (*)
Size: The distance of the two furthest shots from the group.
It means the dimension from the center to the center of the hits. (*)
2.  Dimensions: The square dimension of the group of all shots from the group.
The centers of the outer hits are the cutoffs for this measurement.
Dimensions: The square dimension of the group of all shots from the group.
The centers of the outer hits are the cutoffs for this measurement.
3.  Radius: This is a circle that mathematically includes all hits from the group. The theory of this measurement implies passing a circle through at least two or three central points of the farthest hits, and that it contains all the other hits. (*)
4.  POI (up-down): In relation to the hits from the group, the program precisely calculates the POI (Point of Impact), and this point is connected to the center of the target (POA) by a dotted line, shown in the picture. (*)
5.  POI (left-right): Unlike the above measure, which represents the height deviation, this measure represents the width deviation. (*)
6.  Number of hits: The number of hits you marked during your analysis is displayed here.
7.  Group accuracy: Group accuracy is calculated independently of the center of the target. A higher percentage of this measurement means that your weapon is of better quality, or that you are a better shooter. So this measurement represents the quality of the distribution of your hits in the group.
8.  Target accuracy: This represents the final grade of your shooting, and it means that you have correctly adjusted your optical/mechanical sight following the recommendations from the application, and that you shot accurately.
(*) The result is displayed in metric/imperial units, and if you have specified the exact distance you shot from, a precise angular measurement (MOA-Minute of Angle or MRAD-Milliradian) will also be included.
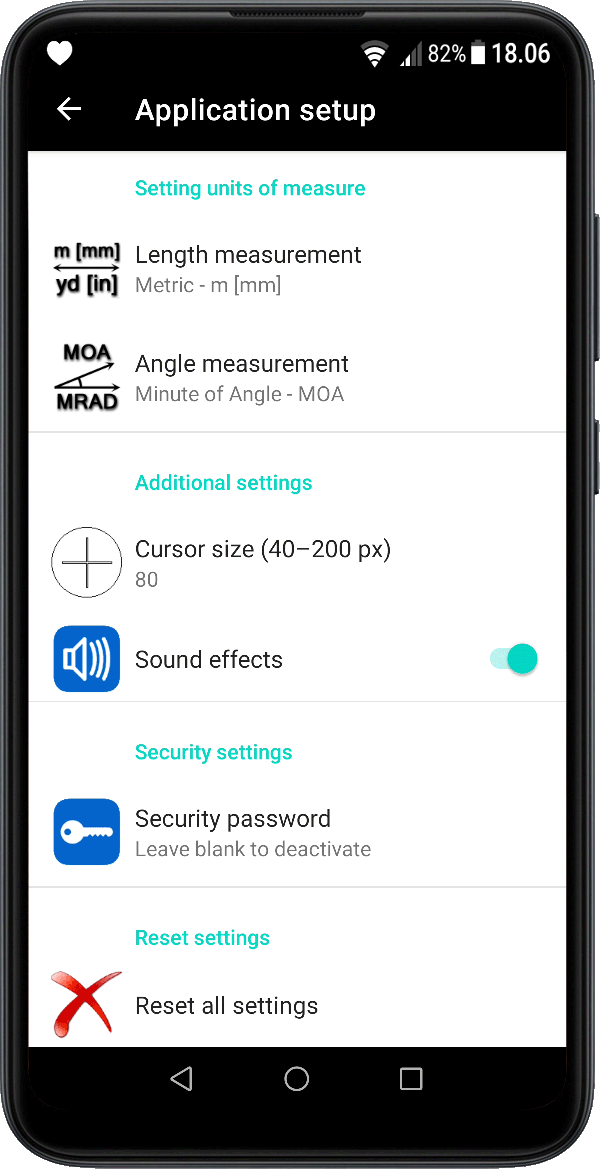
Setting units of measure and more. Set this before any analysis of your hits.
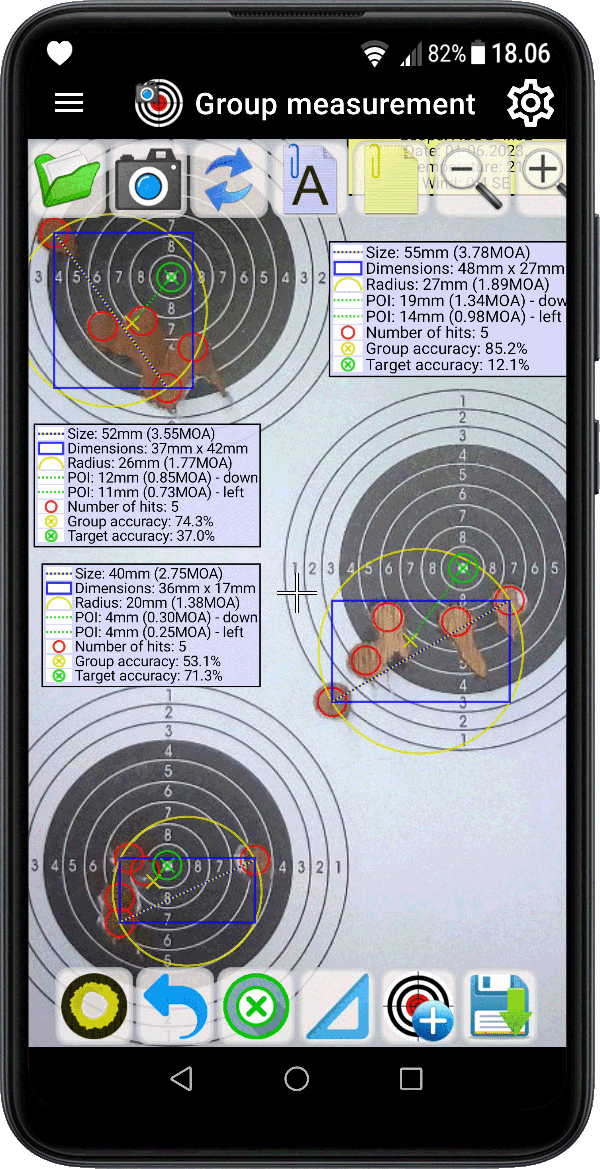
Processing multiple groups of hits. After marking the hits of the first group, hang the results and adjust the size of the results, then continue marking the hits of the next group.
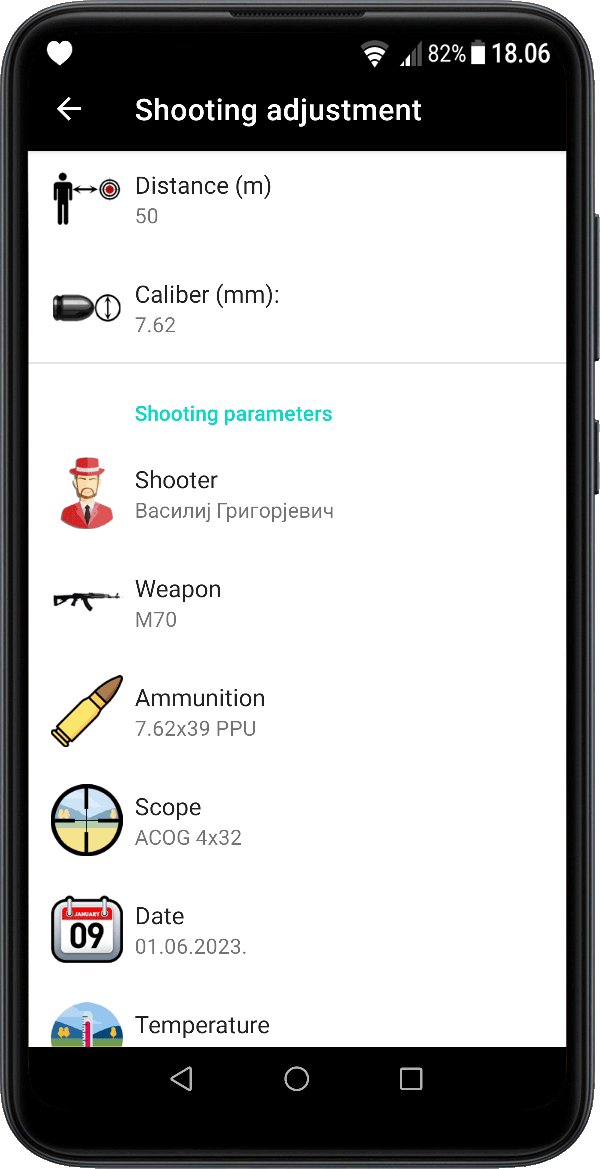
Setting shooting parameters and conditions.
It is recommended that you do this before saving your results.
- All the mentioned features of the application are available in the My Shooting Pro version.
- If you entered all the parameters correctly, the radius of the marked hits should match the radius of the holes of your ammunition on your target.
- "Camera pictures" will store all the images you have taken from the application.
- Your documents are stored in the device's internal memory, accessible only from the application.
- You can share / send them to other applications or people via other applications.
- You can also send pictures from your public gallery to this app for measurement (Edit mode).
- You can provide access to the application with a password.
- Explore the rest in the app :-)
You know yourself that it is not easy and simple to become a good shooter.
In addition to a steady hand, quality weapons and sights, you need a lot of knowledge about shooting.
Many shooters, even professional shooters, have confirmed that they have improved their knowledge and results by using the My Shooting application.
Try it yourself, shooting is a great fun and hobby, but also a profession.